Stateful Styles With XState and Styled System
You've probably seen a button like this one before:
<Button>Cool Button</Button>
One that has options:
<Button secondary>Secondary Cool Button</Button>
Maybe even more options:
<Button tertiary>Tertiary Cool Button</Button>
But what if I did this?
<Button secondary tertiary>Secondary? Cool Button</Button>
That's probably not allowed. I guess we'll change the API to avoid that:
<Button variant="secondary">Secondary Cool Button</Button>
This is kind of a state machine! Your Button can only be in one variant (state) at a time.
Here's what a parallel state machine (basically multiple independent state machines) would look like:
<Button variant="secondary" mode="dark">Dark Secondary Cool Button</Button>
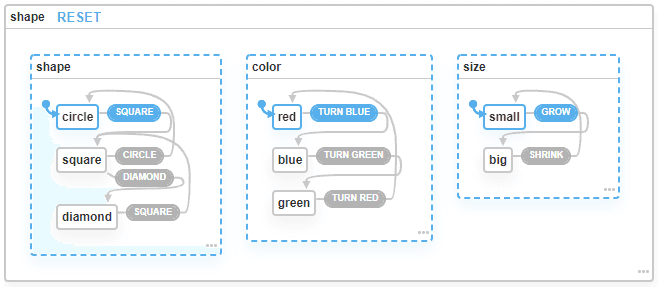
I've found that these kind of style props work very well with logical state machines. Check out the following example of a... thing:
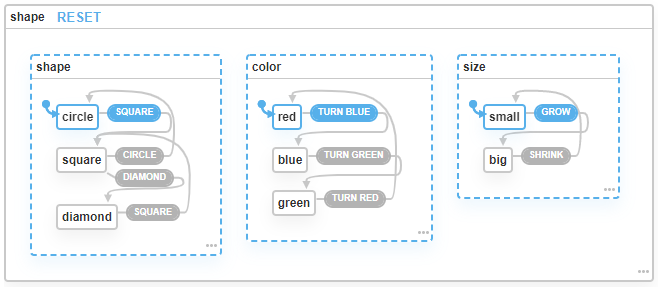
It's a parallel state machine with 3 sub machines:
- One machine that let's you change the shape:
- From Circle to Square
- From Square to Diamond
- From Square to Circle
- From Diamond to Square
- One machine that let's you change the color:
- From Red to Blue
- From Blue to Green
- From Green to Red
- One machine that let's you change the size:
- From Small to Big
- From Big to Small
If we want to craft some stateful styles for this thing, we'd need a component with an API like this:
<Thing shape="circle|square|diamond" color="red|blue|green" size="small|big" />
You can implement it however you like, but what I like to do is use styled-system's variant API, because it maps nicely to the state machines we defined:
import styled from 'styled-components'
import { variant } from 'styled-system'

const Thing = styled(
  variant({
    prop: 'shape',
    variants: {
      square: {
        /** Make it square */
      },
      circle: {
        /** Make it circular */
      },
      diamond: {
        /** Make it a diamond */
      },
    },
  }),
  variant({
    prop: 'color',
    // ...
  }),
  variant({
    prop: 'size',
    // ...
  })
)
(You can use it with either Emotion or Styled Components)
Now to wire it up to our state machine using xstate and @xstate/react
function App() {
  const [state, send] = useMachine(shapeMachine);

  return <Shape {...state.value} />
}
Ta-da! A little explanation:
In case of a hierarchical or parallel state machine, ours being the latter, state.value contains an object representation of our current state (check the docs for more info). Our state could look something like this:
// state.value
{
  shape: "circle",
  color: "red",
  size: "small"
}
Which happens to look exactly like our component's prop interface! Of course you can also do this if you want your code to be a bit more explicit and readable:
function App() {
  const [state, send] = useMachine(shapeMachine);

  const { shape, size, color } = state.value
  return <Shape shape={shape} size={size} color={color} />
}
Here's a CodeSandbox with a fully working example.